How can we help you?
Support
Contact Us
I have a customer support question
We're always here to help! If you have any questions or need assistance, our dedicated customer care team is just a call away at 305-633-9636. You can also reach out by submitting a customer care ticket—simply click on the link below to get started.
Where are you located?
We are located in Fort Lauderdale, Florida, and have a showroom available for visitors. We also ship worldwide.
Address: 2125 SW 2nd Ave Fort Lauderdale, FL 33315
Phone Number: +1.305.633.9636
Showroom Hours: Monday–Friday 9am–5pm
What is your phone number?
You can reach us directly at 305-633-9636. We're standing by and ready to assist you.
Delivery and Returns
Iridium
Iridium 9575 Extreme
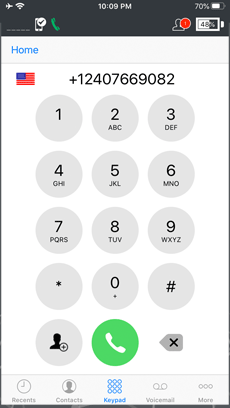
Iridium 9575 Extreme - Dialing Out With Your Iridium Satellite Phone
To place a call anywhere in the world:
- Dial 00 + Country Code + Phone Number. For example, to call a US number you would dial 00-1- 10-digit phone number
To call another Iridium satellite phone:
- Dial 00 + Iridium Phone Number (8816-xxxx-xxxx)
How to Check Your Balance and Top-Up Airtime (Prepaid Customers Only)
- Dial 2888 from your satellite phone to check your prepaid minute balance.This is a free call.
- To add more time you may call us at +13054057173 or online at www.satphonestore.com(You will need either your SIM Card Number or Iridium Phone Number)
Iridium 9575 Extreme Voicemail Instructions
In order to access your voicemail on an Iridium Satellite Phone, please follow the instructions listed below:
- From the Iridium phone dial 00881662990000 (From a land line dial 011 881662990000)
- When you are prompted to enter the iridium number you are trying to reach enter your IRIDIUM VOICE NUMBER
- Then you will hear the greeting. In the middle of the greeting press the star (*) button.
- At that point you will be asked to enter a password. Enter last 7 digits of the Iridium Voice Number that has been assigned to you.
- You will then be in the voice mail set up platform you will be prompted through from there
- Once you have set up your voice mail follow Repeat Steps 1-4.
Note:
- Voice mail and text messages are only saved in the Iridium network for 24 hours.
Iridium 9575 - How to Check Firmware Version
Before updating your Firmware it is important to know what firmware version your phone currently has installed. Please follow the instructions below to find your devices current firmware.
- While on the main screen, please select Menu.
- In the Menu, go down to Setup and press select on the bottom left.
- Here you will have to scroll down until you see Phone Information, click on this.
- In the Phone Information screen you will see the Firmware Version as the first option.
Please Note -The latest firmware upgrade for the Iridium 9575 is version HL21001 release. (December 2021).
If your Firmware is outdated please see our Firmware Update Guide, to update your phone to the latest firmware.
Iridium 9575 Extreme Firmware Update: Staying Connected with HT21001
Keeping your Iridium 9575 satellite phone's firmware up to date is crucial for optimal performance, reliability, and access to the latest features. As of early 2025, the recommended and most widely available firmware version for your Iridium 9575 is HL21001.
Why Update Your Firmware?
Firmware updates often include:
-
Performance Enhancements: Improved call quality, signal acquisition, and overall device responsiveness.
-
Bug Fixes: Addressing any known issues or glitches.
-
Security Patches: Enhancing the security of your device.
-
New Features: Occasionally, updates may introduce minor new functionalities.
Before You Begin: Essential Preparations
To ensure a smooth and successful update process, please follow these steps carefully:
-
Windows PC Required: The firmware update can only be performed on a computer running a Windows operating system. Mac OS is not supported for this process.
-
Fully Charged Battery: Make sure your Iridium 9575 Extreme's battery is 100% charged. An interrupted update due to power loss can severely damage your device.
-
Remove SIM Card: Before starting the update, remove the SIM card from your Iridium Extreme. Reinstall the battery afterward.
-
Disable Bluetooth: On your computer, disable Bluetooth to prevent potential interference during the update.
-
Stable Internet Connection: Your PC needs a stable internet connection to download the necessary update files.
-
Download from Official Sources: Download the firmware update tool and release notes from Iridium's official website Here
How to Check Your Current Firmware Version
You can easily check the current firmware version on your Iridium 9575 Extreme by navigating to:
Menu > Setup > Phone Information
This will help you determine if you need to update to HL21001 or a later version if one becomes available.
The Firmware Update Process
The update process typically involves the following general steps. Refer to the specific instructions provided with the downloaded firmware package for the most accurate details.
-
Download the Firmware Update Tool: Obtain the dedicated firmware update application and the HL21001 firmware file from a reliable source.
-
Install the Tool: Run the downloaded installer on your Windows PC.
-
Connect Your Phone: Connect your Iridium 9575 Extreme to your PC using the original Iridium USB cable. Ensure the connection is secure.
-
Launch the Update Tool: Open the firmware update application on your computer.
-
Follow On-Screen Prompts: The tool will guide you through the update. You may need to select the firmware file you downloaded.
-
DO NOT Disconnect or Interrupt: The upgrade process can take 20 minutes or more. During this time, do not disconnect the handset, press any keys on the phone, or close the update software, even if the screen on your Iridium Extreme goes blank. Interrupting the process can render your phone inoperable and require a service center repair.
-
Verify the Update: Once the update tool indicates completion, safely disconnect your phone. Power it on and navigate to Menu > Setup > Phone Information again to verify that HL21001 is now installed.
Troubleshooting Tips
-
If the update fails, try restarting your computer and the phone, then attempting the process again.
-
Ensure no other applications are running in the background on your PC that could interfere.
-
If you encounter persistent issues, consult the troubleshooting section of the official release notes or contact Iridium customer support or your authorized dealer.
Keeping your Iridium 9575 updated ensures you have the most reliable and efficient communication tool at your fingertips, wherever your adventures take you.
How to Communicate with an Iridium Satellite Phone
There are a few ways to communicate with an Iridium Satellite Phone user. Below are all the different ways to do so:
- Dial 011+ the satellite phone number (8816-xxxx-xxxx)This is an international call and will be billed to the caller at their long distance rate by their telephone service provider.
- SMS Message- receive free text email up to 120 characters per message the customer needs to visit http://messaging.iridium.com/
- Sending an EMail - Use the customers Iridium Phone Number as their email address. Example - IRIDIUMNUMBER@msg.iridium.com
- Using 2 Stage Dialing- Dial 1-480-768-2500. At the prompt enter the 12 digit Iridium phone numberThis feature will deduct the usage time from the satellite phone user
Iridium 9555
Iridium 9555 - Dialing Out With Your Iridium Satellite Phone
To place a call anywhere in the world:
- Dial 00 + Country Code + Phone Number. For example, to call a US number you would dial 00-1- 10-digit phone number
To call another Iridium satellite phone:
- Dial 00 + Iridium Phone Number (8816-xxxx-xxxx)
Iridium 9555 Voicemail Instructions
In order to access your voicemail on an Iridium Satellite Phone, please follow the instructions listed below:
- From the Iridium phone dial 00881662990000 (From a land line dial 011 881662990000)
- When you are prompted to enter the iridium number you are trying to reach enter your IRIDIUM VOICE NUMBER
- Then you will hear the greeting. In the middle of the greeting press the star (*) button.
- At that point you will be asked to enter a password. Enter last 7 digits of the Iridium Voice Number that has been assigned to you.
- You will then be in the voice mail set up platform you will be prompted through from there
- Once you have set up your voice mail follow Repeat Steps 1-4.
Note:
- Voice mail and text messages are only saved in the Iridium network for 24 hours.
Iridium 9555 - How to Check Firmware Version
Before updating your Firmware it is important to know what firmware version your phone currently has installed. Please follow the instructions below to find your devices current firmware.
- While on the main screen, please select Menu.
- In the Menu, go down to Setup and press select on the bottom left.
- Here you will have to scroll down until you see Phone Information, click on this.
- In the Phone Information screen you will see the Firmware Version as the first option.
Iridium 9555 Firmware Update: Staying Connected with HT21001
Keeping your Iridium 9555 satellite phone's firmware up to date is crucial for optimal performance, reliability, and access to the latest features. As of early 2025, the recommended and most widely available firmware version for your Iridium 9555 is HL21001.
Why Update Your Firmware?
Firmware updates often include:
-
Performance Enhancements: Improved call quality, signal acquisition, and overall device responsiveness.
-
Bug Fixes: Addressing any known issues or glitches.
-
Security Patches: Enhancing the security of your device.
-
New Features: Occasionally, updates may introduce minor new functionalities.
Before You Begin: Essential Preparations
To ensure a smooth and successful update process, please follow these steps carefully:
-
Windows PC Required: The firmware update can only be performed on a computer running a Windows operating system. Mac OS is not supported for this process.
-
Fully Charged Battery: Make sure your Iridium 9555 Extreme's battery is 100% charged. An interrupted update due to power loss can severely damage your device.
-
Remove SIM Card: Before starting the update, remove the SIM card from your Iridium Extreme. Reinstall the battery afterward.
-
Disable Bluetooth: On your computer, disable Bluetooth to prevent potential interference during the update.
-
Stable Internet Connection: Your PC needs a stable internet connection to download the necessary update files.
-
Download from Official Sources: Download the firmware update tool and release notes from Iridium's official website Here
How to Check Your Current Firmware Version
You can easily check the current firmware version on your Iridium 9555 Extreme by navigating to:
Menu > Setup > Phone Information
This will help you determine if you need to update to HL21001 or a later version if one becomes available.
The Firmware Update Process
The update process typically involves the following general steps. Refer to the specific instructions provided with the downloaded firmware package for the most accurate details.
-
Download the Firmware Update Tool: Obtain the dedicated firmware update application and the HL21001 firmware file from a reliable source.
-
Install the Tool: Run the downloaded installer on your Windows PC.
-
Connect Your Phone: Connect your Iridium 9555 Extreme to your PC using the original Iridium USB cable. Ensure the connection is secure.
-
Launch the Update Tool: Open the firmware update application on your computer.
-
Follow On-Screen Prompts: The tool will guide you through the update. You may need to select the firmware file you downloaded.
-
DO NOT Disconnect or Interrupt: The upgrade process can take 20 minutes or more. During this time, do not disconnect the handset, press any keys on the phone, or close the update software, even if the screen on your Iridium Extreme goes blank. Interrupting the process can render your phone inoperable and require a service center repair.
-
Verify the Update: Once the update tool indicates completion, safely disconnect your phone. Power it on and navigate to Menu > Setup > Phone Information again to verify that HL21001 is now installed.
Troubleshooting Tips
-
If the update fails, try restarting your computer and the phone, then attempting the process again.
-
Ensure no other applications are running in the background on your PC that could interfere.
-
If you encounter persistent issues, consult the troubleshooting section of the official release notes or contact Iridium customer support or your authorized dealer.
Keeping your Iridium 9555 updated ensures you have the most reliable and efficient communication tool at your fingertips, wherever your adventures take you.
Iridium GO
Getting Started with your Iridium GO!
CONFIGURING YOUR SMARTPHONE OR TABLET
1) Insert your SIM card and battery into your Iridium GO! Make sure you have a clear view of the open sky, then turn on your GO! by simply lifting the antenna. Iridium GO! will automatically complete the power up sequence in approximately one minute and will begin registration with the Iridium network. Once registered, the signal strength icon will appear on the Iridium GO! device screen.
2) Download the free “Iridium Go!” app from App Store or Google Play. This app manages your connection to the GO! and allows you make phone calls, send text messages, and has tracking and SOS functions. The free “Iridium Mail and Web” may also be downloaded and will allow you to send and receive email. (Registration at www.iridium.com/mailandweb is required)
3) On your iOS or Android device, connect to the wireless network created by your Iridium GO. It will look something like “IRIDIUM-xxxxxx.” No password is required.
4) Launch the Iridium GO! app. The initial username and password for the app are both guest. DO NOT CHANGE THESE.
- To secure your connection, create an additional user and give it Administrator Privileges.
- THEN remove Administrator Privileges from the "guest" account and disable access.
DIALING OUT WITH YOUR IRIDIUM GO!
1) To place a call click on the phone icon.
2) Dial 00 Country Code Phone Number. For example, to call a US number you would dial 00-1-ten digit phone number or find the proper country flag from the drop down menu.
3) To call another Iridium satellite phone, dial 00 Iridium Phone Number (8816-xxxx-xxxx)
HOW PEOPLE CAN REACH YOU
1) Direct Dial - 011 then the Iridium GO! number (8816-xxxx-xxxx)
This is an international call and will be billed to the caller at their long distance rate by their telephone service provider.
2) SMS Message- Free SMS messages (up to 120 characters) can be sent to your Iridium phone number from www.satphonestore.com. Messages sent from the phone are billed at approximately 1/2 your per-minute rate per message.
3) Email - Your GO!’s email address is your iridiumnumber@msg.iridium.com These messages are delivered via SMS to device.
4) Two-Stage Dialing - Dial 1-480-768-2500. At the prompt enter the 12 digit Iridium phone number This feature will deduct the usage time from the satellite phone user
SETTING UP TEXTING FEATURE
Before a subscriber can send an SMS message from the Iridium system, the Iridium SMS service center number must be stored on your Iridium GO. To store or verify the Iridium Service Center Number on your Go please follow the directions below:
- Make sure you have installed your SIM card in the GO!.
- Power on your GO!.
- Pair your PC or smart device to the GO! WIFI network.
- Open the Iridium GO! application on your smart device.
- Log in using the default username “guest” and password “guest”.
- Once logged in select “Settings.”
- In Settings select “Message.”
- Enter the following Service Center number: 00881662900005.
- Select “save” once number has been entered.
- If “Save” is not highlighted in blue touch anywhere on the empty screen below and “Save” should turn blue allowing you to save number.
If this method doesn't work for you, please click here for optional methods that may work for you.
VOICE MAIL
1) From the Iridium GO! dial 00881662990000 (From a land line dial 011 881662990000)
2) When you are prompted to enter the iridium number you are trying to reach enter IRIDIUM VOICE NUMBER
3) Then you will hear the greeting. In the middle of the greeting press the star (*) button.
4) At that point you will be asked to enter a password. Enter last 7 digits of the Iridium Voice Number that has been assigned to you.
5) You will then be in the voice mail set up platform you will be prompted through from there
6) Once you have set up your voice mail follow Repeat Steps 1-4.
Note:Voice mail and text messages are only saved in the Iridium network for 24 hours.
Setting Up Your Iridium GO! to work with ExtremeTrackPro
So you've activated ExtremeTrackPro service for your Iridium GO! satellite device, and now you need to set up your GO! to work on the portal and start tracking. Before setting up the Iridium device it is important that you have already received a welcome email with your username and password for www.extremetrackpro.com and that you are able to login in. If you have not yet received that email please check your junk email and bulk email folders to see if it landed there. If you still cannot find it please it contact supportdesk@atlanticrt.com.
Configure the Iridium GO! device:
- Login to the Iridium GO! app on your smart phone.
- Click on Settings > Track.
- Add the email iridiumgo@gap-uk-1.globalalerting.com to Quick GPS Recipients.
- Set tracking frequency to 5 minutes or higher. (Important! never set your tracking frequency to less than 5 minutes)
- Add the email iridiumgo@gap-uk-1.globalalerting.com to Tracking Recipients.
- Your Iridium GO! is now linked to the portal.
Iridium GO! App - Setup
Overview
Powered by the world’s furthest reaching network, Iridium GO!® dramatically extends the capabilities of your personal smartphone, tablet, or laptop to anywhere on the planet!
Download the new Iridium GO! app to keep your personal smart device connected everywhere. Now with user-friendly onboarding screens and bright colors for reduced glare in both light and dark, the Iridium GO! app allows you to pair your personal smartphone or tablet for:
- Voice Calling
- SMS Text Messaging
- Emergency / SOS Alerting
- GPS & Tracking
Tips for New Users: Follow the new-user walkthrough screens upon initial launch of the app to set up your Iridium GO! and prepare for your next adventure!
Tips for Existing Users: Take advantage of the latest version of the Iridium GO! app by updating the app on your smartphone or tablet.
Downloading the App & Connecting to Iridium GO! Wi-Fi
Step 1: Download the Iridium GO! App
- Connect to a Wi-Fi or cellular data network (LTE/3G/2G).
- Follow the links below for your mobile platform:Android: Google Play™ Store App iOS devices: Apple App Store® App
- Install the app to your device
Step 2: Pairing Your Device
To ensure your smartphone/device is ready to use, it is recommended that you pair them prior to traveling.
Set up the Iridium GO! unit in an outdoor area with open access to the sky and 5 bars of signal strength prior to use. Without full signal strength, the data rate will drop dramatically.
Note: If Iridium GO! does not have signal strength, the device is probably not activated.
To pair your device:
- Turn the Iridium GO! on by flipping up the antenna
- Wait for the Iridium GO! to initialize and establish connection with the Iridium network
- Go to Wi-Fi settings
- Select the “Iridium-XXXX” Network on your Android™ or iOS device
- Wait for your device to connect to the Iridium GO! Wi-Fi network
Note: Android Devices: On some Android devices, you may need to turn on Airplane mode, and then connect to the Iridium Wi-Fi.
Step 3: Wi-Fi Connectivity
In order for your Iridium GO! App to operate, you must be connected to the Iridium GO! Wi-Fi network.
To connect to the Iridium GO! Wi-Fi network:
- Power up your Iridium GO! device by raising the antenna
- Enable the Wi-Fi option on your iOS/Android device
- Go to your Wi-Fi settings and from the list of networks available, please select the Iridium GO! Wi-Fi network. It will be named as “IRIDIUM-XXXX”Note: You need to be within the Iridium GO! Wi-Fi range, so the network shows up in your list of available networks. (approximately 30 meters/100 feet)
- Select “IRIDIUM-XXXX” network to connect to it. This Wi-Fi network is not password protectedNote: Please disable your Bluetooth option to avoid interference with the Wi-Fi.
Note: On some Android devices, you may need to enable airplane mode, then connect to the Iridium GO! Wi-Fi.
IMPORTANT: If you are having issue logging into the Iridium GO thru the Go application on your iOS 15 device. please follow these steps:
- To fix this issue please go to your iPhone setting then to "Wi-Fi". here you should see your phone is connected to the Iridium Go Wi-fi (should have a blue check mark next to the Iridium Wi-fi signal on the left).
- On the right of the Wi-fi signal you should see a blue circle with a "i" in it, click on this, this will open the Iridium GO Wi-fi signal setting.
- Turn off "Private Wi-fi address" and " Limit IP address Tracking" . Once this is done you will be able to log on to the GO thru the Iridium GO application.
- Close the GO application if it was open and reopen the application. You should now be able to log on to the GO thru the application using the username and password "guest".
Login to the App
Step 1: Login to Iridium GO! App
Up to (5) devices can be wirelessly connected to the Iridium GO! at one time, but only (1) user may make calls, or access data at a time.
To Login to the Iridium GO! App:
- Launch the Iridium GO! app from your iOS/Android device
- Select ALLOW letting your smart device send you notifications about the Iridium GO! App
- Read the SOS Operation disclaimer carefully, then click OK
- Read the End-User License Agreement that pops-up carefully, then click ACCEPTNote: You can select “Do not show again” only after you read through the entire document (scroll down to the bottom).
- Enter/verify that the username and password are both “guest” (all lowercase)
- Click on SUBMIT and you’ll be successfully logged in to your Iridium GO!® appNote: In case you do not automatically receive a pop – up with login information, click on LOGIN option located at the bottom of your app screen and follow steps as before.
Step 2: Understanding the Iridium GO! App’s Home Screen
Step 3: Understanding the Iridium GO! App’s “Status Bar”
Setting Up Your Iridium GO! App
SOS on Your Iridium GO!
Iridium GO! offers a programmable SOS button that can be configured to notify specified contacts in the case of an emergency. Once configured, an SOS can be initiated either from the Iridium GO! device or the application.
If an SOS is initiated by pressing the SOS button on the Iridium GO! device, it will only send an emergency message with location information. If an SOS is initiated from the Iridium GO! application, it will also provide the option for two-way voice communication with the designated contact.
Step 1: Setup SOS - GEOS Safety Services on Your Iridium GO! (Mandatory)
To support the SOS feature, Iridium has contracted with GEOS Travel Safety Group to provide an emergency response coordination service for your Iridium GO! at no additional charge. These services are offered and are provided exclusively by GEOS and not by Iridium which is a separate, unrelated company.
Note: Standard airtime charges will apply to SOS mode messages and/or calls to GEOS, a valid Iridium SIM subscription and online registration at www.geosalliance.com/iridium is required.
Steps to Setup the GEOS Service:
- Register at geosalliance.com/iridium from your computer. To register, you will need your Iridium phone number and Iridium GO! IMEI (located on the Help → About page in the Iridium GO! App).
- Navigate to Settings → SOS → GEOS Service on the Iridium GO! App
- Select ‘Use,’ and enter the 5-digit authorization code provided by GEOS, then click on Submit. If successful, your SOS settings will appear and the SOS action will be set to Call and Message, for the GEOS service.
- Add additional emergency message contacts, which is an optional feature (see Message Recipient, below) is also available. The Message action enables automatic Emergency SMS alerts to be sent at 5-minute intervals until cancelled.
When SOS is initiated from the Iridium GO! application, the Call and Message action enables the message feature as well as an automatic phone call to your designated call recipient.
Call Recipient: Enter the number for your Call Recipient. It is important that the number is entered in the correct international format with the international access code (+ or 00), country code, and phone number for proper routing.
Spoken Language: Select the spoken language of the emergency response personnel.
Note: The SOS setup is related to your SIM card. Thus, if you deactivate the service and get a new SIM card you will need to register the GEOS service again.
Step 2: Setup Location Tracking using your Iridium GO! (optional)
Iridium GO! can track your location in two ways. First, by the Quick GPS option where a one-time sent location information can be received by a group of predefined recipients. Secondly, by Interval Tracking option where messages are sent automatically to a recipient at a scheduled interval frequency.
Quick GPS
- Go to Iridium GO! App’s home screen and select the Settings option
- Select Track from the menu, and enter for the Quick GPS up to 5 recipients’ contact numbers or email addresses
Interval Tracking
- Go to Iridium GO! App’s home screen and select the Settings option
- Select the Track option from the list, select the Tracking Frequency from the list as desired
- Enter the Tracking recipient’s email address or contact number
Once configured, regular tracking messages will be sent automatically even if the Iridium GO! application or smartphone is turned off.
Note: Usage fees apply for Quick GPS and Interval Tracking; settings will apply until modified.
Using Functions on the Iridium GO! App
Call
Make Calls using your Iridium GO!- Select Call icon from the Iridium GO! App’s home screen
- Ways to call:
- Enter the full dialing sequence: 00 or +[Country Code][Phone Number]
- Use the Country Flag drop down menu
- Select from your existing contactsNote: If you are dialing from existing Contacts, make sure to edit and insert the international access and country code (ex. +81) to complete calls on the Iridium network.
- Press the Call button to initiate the call
- Press the End call button to end the call once complete
Note: Please note, only one user at a time will be able to make a call on the Iridium Network.
Receive Calls on your Iridium GO!To receive calls on your Iridium GO!, provide the caller with your Iridium GO! number which will look similar to + 8816-XXXX-XXXX. However, please note that this would be considered as an international call and will be billed accordingly to the caller at their long distance rate by their telephone service provider.
For United States Subscribers: You could request a “Plus one number” activation from your service provider, which will be a local US number, that will be linked to your Iridium Number. Any calls to this number, will be forwarded to your Iridium Number and the calls from a local US number will not be charged as international roaming.
Dialing within the Call function of the Iridium GO! App.
Message
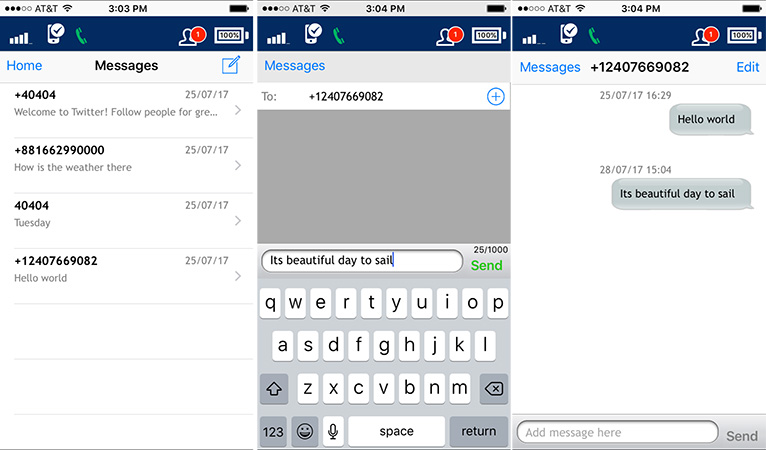
Send Messages on your Iridium GO!
- Select the Message icon from the Iridium GO! App’s home screen; you’ll now be able to view all your conversations
- Click on compose icon option at the right corner of the screen
- Ways to send a message:
- Enter the full dialing sequence: 00 or +[Country Code][Phone Number]
- Select from your existing contacts in the space provided to “Enter Recipient”,
- Use the plus “+” symbol to add from contactsNOTE: If you are selecting from your existing Contacts, make sure to edit and insert the international access and country code (ex. +1) to complete calls on the Iridium network.
- Compose your text message in up to 1000 characters and enter in the space provided
- Click on the Send option on the bottom of the screen and your text message will be sent; you can select the conversation to view status of the message
Screenshot sequence showing Messaging within the Iridium GO! App.
Receive Messages on your Iridium GO!To receive messages provide your contact with your Iridium GO! number which will look similar to + 8816-XXXX-XXXX. Free text messages up to 160 characters can be sent to your Iridium phone number from . This is the most popular way to send SMS messages to an Iridium GO! number.
Alternatively, people can also text from their mobile phone directly but kindly note that this will be considered as an international text and will be billed according to the caller at their long distance messaging rate by their telephone service provider.Note: Please check whether your mobile service provider allows international text messages to be delivered.
SOS
SOS on your Iridium GO!
Iridium GO! offers a programmable SOS button that can be configured to notify specified contacts in the case of an emergency. Once configured, an SOS can be initiated either from the Iridium GO! device or the application.
If an SOS is initiated by pressing the SOS button on the Iridium GO! device, it will only send an emergency message with location information. If an SOS is initiated from the Iridium GO! application, it will also provide the option for two-way voice communication with the designated contact.
Track
Quick GPS
- Go to home screen, click the Track icon and, wait for location information to appear (initial update can take up to two minutes)
- Press the Quick GPS button to send a request for GPS information
Note: Usage fees apply for Quick GPS and Interval Tracking; settings will apply until modified.
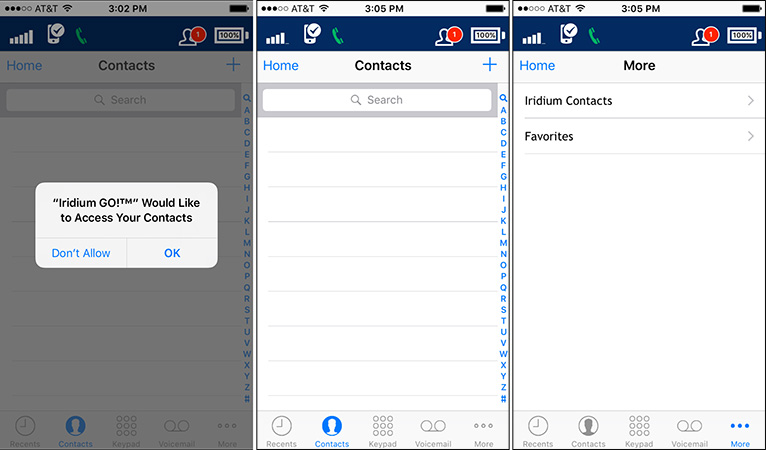
Contacts
View existing contacts stored in your smartphone/device. Existing contacts that are stored in your smartphone should be updated to their full internal dialing sequence in order to connect calls: '+' [Country Code] [Phone Number].
Note: “Personal Contacts” are stored on the personal device and “Shared Contacts” will be stored on the Iridium GO! device and shared among all Iridium GO! users that connect onto the device.
Screenshots of the Contacts function of the Iridium GO! App.
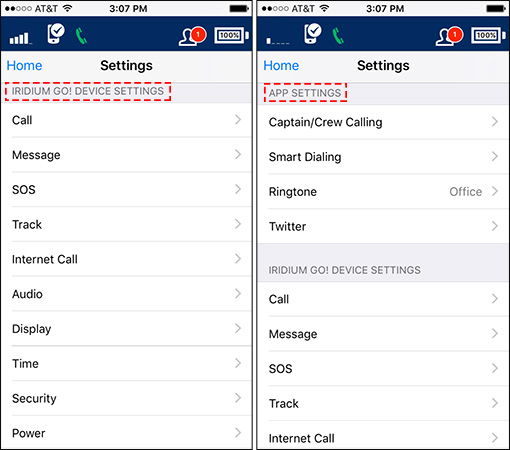
Settings
APP SETTINGS
- Captain/Crew Calling: Under “App settings”, you can enable your Iridium GO! for “Captain/Crew Calling”. For more details please refer to the Iridium GO! – Captain Crew Calling PDF.
- Smart Dialing: Allows call connection to a local or international phone number from the app; this is particularly helpful for phone numbers entered without an international prefix and country code from your contacts list.
- Ringtone: Modify your ringtone for your calls received
- Twitter: Configure your Twitter settings. It is recommended that Twitter be used from the Iridium Mail & Web App.
IRIDIUM GO! DEVICE SETTINGS
Primarily used to configure SOS and Tracking, as shown above. You can also use the “Power” option to enable/disable your GPS, the “Security” option to lock your SIM, and the “Audio” option to set notifications, adjust volume, etc.
Screenshots highlighting difference between App Settings and Device Settings in the Iridium GO! App.
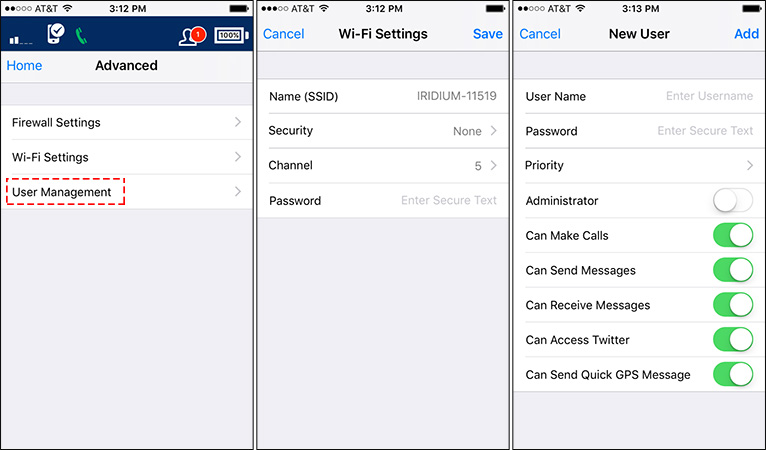
Advanced
Wi-Fi Settings: Modify the name of the Wi-Fi network and set a password
User-Management: Add users and customize the access type for each. Note: Regardless of the number of users you've added, only five (5) can be connected to Iridium GO! at one time.
Screenshots showing User Management functionality of Iridium GO! App.
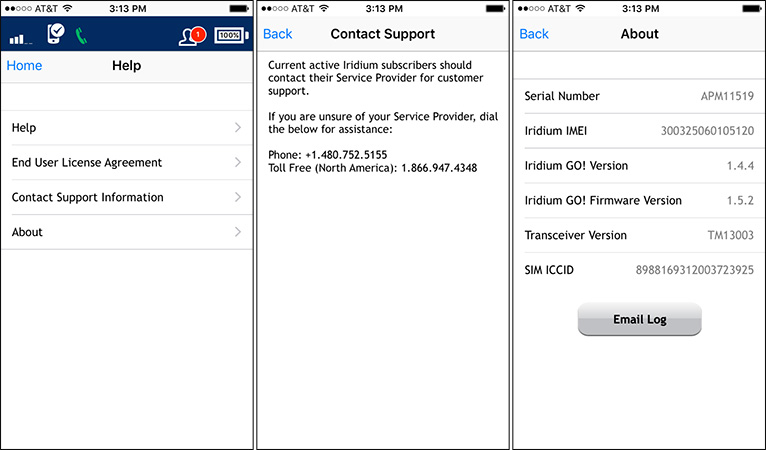
Help
Under Help you will find:
- Help Topics
- “End User License Agreement”
- “Contact Support”
For detailed information about your Iridium GO!, click “About”.
Screenshots of the Help menus of the Iridium GO! App.
Iridium GO! How To Videos
Iridium GO! Dialing Instructions
Iridium GO! SIM Card and Battery Installation
Iridium GO - Connecting Your Smartphone or Tablet
Follow these steps to initially start up your Iridium GO:
- Insert your SIM card and battery into your Iridium GO!
- Make sure you have a clear view of the open sky, then turn on your GO! by simply lifting the antenna.
- Iridium GO! will automatically complete the power up sequence in approximately one minute and will begin registration with the Iridium network.
- Once registered, the signal strength icon will appear on the Iridium GO! device screen.
Once your Iridium GO has powered up and has connected to the Iridium Network, follow these steps to connect to your GO and finish the initial setup:
- On your iOS or Android device, connect to the wireless network created by your Iridium GO. It will look something like “IRIDIUM-xxxxxx.” No password is required.
- Download the free “Iridium Go!” app from App Store or Google Play. This app manages your connection to the GO! and allows you make phone calls, send text messages, and has tracking and SOS functions. The free “Iridium Mail and Web” may also be downloaded and will allow you to send and receive email and pictures, browse the internet and interact with social networks. (Registration at www.iridium.com/mailandweb is required)
- Launch the Iridium GO! app. The initial username and password for the app are both guest. DO NOT CHANGE THESE
To secure your connection to your Iridium GO:
- Create an additional user and give it Administrator Privileges.
- THEN remove Administrator Privileges from the "guest" account and disable access.
- For further instructions please refer to your user manual.
WiFi Issues with Windows PCs
The Iridium GO is not compatible with the newest WiFi Standard 802.11ac. This means if your Computer has 802.11ac you will have issues connecting to the Iridium GO.
A workaround is to buy a 802.11g/n Network Adapter. This will allow you to connect your PC to your Iridium GO as intended.
Dialing on your Iridium GO
If you have a US Number Plan click here for the Dialing Instructions.
To make a phone call on your Iridium GO, you will first need to connect to the Iridium GO, open the Iridium GO app on your smartphone or tablet and click the phone icon. Follow these instructions to complete the call:
To call anywhere in the world:
- Dial 00 + Country Code + Phone Number. For example, to call a US number you would dial 00-1-ten digit phone number or find the proper country flag from the drop down menu.
To call another Iridium satellite phone:
- Dial 00 + Iridium Phone Number (8816-xxxx-xxxx)
How to Contact an Iridium GO
There are many ways to communicate with an Iridium GO user, such as:
1) Direct Dial - 011+ the Iridium GO! number (8816-xxxx-xxxx)
- This is an international call and will be billed to the caller at their long distance rate by their telephone service provider.
2) SMS Message- Free SMS messages (up to 120 characters) can be sent to your Iridium phone number from www.satphonestore.com. Messages sent from the phone are billed at approximately 1/2 your per-minute rate per message.
3) Email - Your GO!’s email address is your iridiumnumber@msg.iridium.com These messages are delivered via SMS to phone (Up to 120 characters per message).
4) Two-Stage Dialing - Dial 1-480-768-2500. At the prompt enter the 12 digit Iridium phone number This feature will deduct the usage time from the satellite phone user
How to Check Your Balance and Top-Up Airtime Iridium GO (Prepaid Customers Only)
If you are prepaid customer you may want to check your remaining balance or top-up your current airtime.
- Dial 2888 from your satellite phone to check your prepaid minute balance.This is a free call.
- To add more time you may call us at +13054057173 or online at www.satphonestore.com(You will need either your SIM Card Number or Iridium Phone Number
Inserting SIM Card and Battery
In order to install the SIM Card and/or replace the Battery, please follow the instructions below:
- Using a Flathead Screwdriver, unscrew and remove the battery cover on the back of the Iridium GO. Once removed the SIM Card should be visible.
- Lift the cover of the SIM Card Tray and slide the SIM Card into the notches on the cover, making sure the slanted side aligns with the tray.
- Lower the cover of the SIM Card Tray and slide to lock it into place. Make sure you feel the cover click into place.
- Place the battery inside the compartment making sure the tabs align with those inside the compartment.
- Replace the Battery Cover on the back of the Iridium GO and screw into place.
Setting Up Texting Feature on Iridium GO!
Before a subscriber can send an SMS message from the Iridium system, the Iridium SMS service center number must be stored on your Iridium GO.
To store or verify the Iridium Service Center Number on your Go please follow the directions below:
There are two ways to verify service center is stored in your Iridium GO.
Option 1: Via The Iridium GO Application.
- Make sure you have installed your SIM card in the GO!.
- Power on your GO!.
- Pair your device to the GO! WIFI network.
- Open the Iridium GO! application on your smart device.
- Log in using the default username “guest” and password “guest”.
- Once logged in select “Settings.”
- In Settings select “Message.”
- Enter the following Service Center number: 00881662900005.
- Select “save” once number has been entered.
- If “Save” is not highlighted in blue touch anywhere on the empty screen below and “Save” should turn blue allowing you to save number.
Option 2: Via The Iridium GO! Advanced Features
This can be done using either a PC or smart device.
- Make sure you have installed your SIM card in the GO!.
- Power on your GO!
- Pair your PC or smart device to the GO! WIFI network.
- Open your web browser (Chrome, Safari, Firefox, etc…) and in the address bar type: 192.168.0.1
- Log in using the default username “guest” and password “guest”.
- Once logged in hit OK to bypass SOS warning. (You can do this part later)
- Select the “Communication” tab at the top of the screen.
- Select “Satellite” on the left of the screen.
- Select “Message” tab in the middle the screen.
- Enter the following Service Center number: 00881662900005.
- Select “save” once number has been entered
Iridium GO! Captain and Crew Calling
A captain or crew calling scratch card can be used in the Iridium GO! device. The application can be configured to dial the first stage dialing number and submit the captain PIN or crew scratch # automatically. To configure this setting:
- Make sure your device is connected to the Iridium GO!
- Open your Iridium GO! application
- Click on Settings
- Go to the Captain/Crew calling setting
- Make sure this setting is enabled.
- Select which this device will be Captain or Crew
- Input the PIN/Scratch #.
Your device should now be setup for Captain/Crew Calling.
Iridium GO! Firmware Update
Iridium has released Iridium GO! firmware version 2.1.22 that provides the following updates:
- Support for SBD applications developed specifically for the GO!
- SMS Memory full issue due to large (more than 1000 characters) - fixed
- Connected clients doesn't reset when Wi-Fi powered off - fixed
Checking the Firmware can be accomplished in one of 2 ways:
On the Iridium GO!:
- Use the left or right buttons, on the Iridium GO device, to navigate to the Information Screen.
- On the Information screen you will see:
- Device Serial Number
- Wi-Fi SSID
- IMEI
- Current Firmware Version
- Hardware Revision
- Transceiver Firmware
On the Iridium GO Application:
- Connect to your Iridium GO (via Wi-Fi)
- Sign in to the Iridium GO Application using the "guest" account
- Once logged in you will need to navigate to HELP>ABOUT>Iridium Go! Firmware Version
To update the firmware on your device please perform the following actions:
- Download the firmware file by clicking on this LINK.
- Unzip the downloaded firmware file to your Desktop.
- Power on the Iridium GO! by flipping up the antenna.
- Wait for the device to fully boot.
- From your computer (must be a computer and not an iPad, iPhone, or Android phone) join the Iridium GO! Wi-Fi network. Example Iridium GO! SSID: IRIDIUM-02473.
- Open a web browser and type in the following IP address into the address bar: 192.168.0.1.
- An Iridium interface page will open.
- Type in "guest" for the "User Name" and "Password" fields.NOTE: The screenshots below will reference an older version of firmware. Please ignore the version number. The steps are still accurate.
- From the main page, click on the "System" tab.
- Click on the "Choose File" button.
- Select the previously unzipped firmware file. The file name should be called "maxwell-2.1.22.frm"
- Once the file has been selected, click on the "Upgrade" button.
- The progress bar will start to count up to 100%. The upgrade will take up to 15 minutes to complete.
- 14. Once the firmware update reaches 100% the Iridium GO! will reboot. The device will be ready to use again.
Iridium Mail & Web App - Android Quick Start Guide
Iridium Mail & Web mobile application is available for download on the Google Play™ store. This quick start guide provides step-by-step instructions for configuring Iridium Mail & Web application & its various features to work with Iridium GO!.
Download Iridium Mail & Web app
While connected to a Wi-Fi network (recommended) or a terrestrial cellular network with data connection, search for ‘Iridium Mail & Web’ in Google Play store. Download and install the app on your smartphone or tablet running Android 2.3 or higher.
Register for an Iridium account
Navigate to www.iridium.com/mailandweb URL to fill out the registration form, follow the instructions and register for a username and password. Select ‘Iridium GO!’ from the device selection drop-down menu in the registration form. Registration for an account is free and required to use the application.
Pair the Android™ device with Iridium GO!
- Setup the Iridium GO! unit in an outdoor area with open access to the sky and adequate signal strength prior to use
- Flip up the antenna on Iridium GO! to turn it on
- Wait for Iridium GO! to initialize and establish connection with the Iridium network
- On your Android™ device, go to Wi-Fi setting and select ‘Iridium-xxxx’ network. Wait for your smartphone or tablet to connect to the Iridium GO! Wi-Fi network.
Login to the application
Open the Iridium Mail & Web app. You will be asked to enter the registered username and password in the initial User’s setting screen. Enter the credentials as supplied during registration and click on ‘Save’ to gain access to the application. Accept the terms and conditions outlined in the End User License Agreement popup. This dialog is displayed only on the initial user login.
Configure device connection type
After logging in to the application for the first time, the app will guide you to configure the device connection type. Click OK to be redirected to the device selection screen. Select ‘Iridium GO!’ as your connection type and click the back button. Alternatively, you can run the device auto-detection capability by selecting ‘AutoDetect Router’ button.
Note: Ensure that the ‘Diagnostics’ is turned off. This is an advanced option and is used Iridiumsupport personnel to troubleshoot device connection & detection issues with the user.
Configure Web surfing
Iridium Mail & Web allows you to surf the web. To access web pages via Iridium Mail & Web, youmust first download, and install XWeb Satellite Web Browsing app from Google Play store.To access web pages using Iridium Mail & Web:
- Click on the ‘Web’ icon on the home screen. The app will start dialing a connection.
- After the connection is up, the app will automatically open the XWeb browser and ask you for username and password. Enter the username and password used for registration on www.iridium.com/mailandweb.
- Enter a mobile website in the browser and press "Enter" (see www.iridium.com/mobile for a list) .
- Continue to access Web content. When finished, close your XWeb app and return to the Iridium Mail & Web app.
- Click the "Web" icon on the main home screen and stop the data connection
Note: Airtime charges will continue while the connection is active. Do not visit standard Internet pages as videos and graphic-heavy pages designed for broadband networks will not download properly using Iridium Mail & Web.
Configure Social Media settings (Twitter)
- Connect to the internet at home before going on your trip. Twitter registration will fail if you are not connected to the internet.
- Click on the Settings icon on home screen, select ‘Social Media’ and turn on Twitter
- A window will appear asking you to login to Twitter & authorize Iridium Mail & Web to post on your behalf. Enter the login information and click OK
- A PIN will be generated once authentication has been granted. Record the PIN.
- Enter the PIN in the appropriate location and hit OK.
Once this configuration is complete, tweets can be posted via Iridium Mail & Web using the Twitter icon on the home screen.
Configure weather forecast service
The application provides various user-customizable settings for the weather forecast service. To configure these settings
- Click on Settings icon on the home screen
- Click on ‘Weather’
- Set locales: allows you to request weather information for different locations.
You can either save current location, enter latitude\longitude coordinates manually orselect from a list of approx. 9000 airports worldwide
- Click on ‘Locations’
- To add a location, click on ‘Add Another Location’ button.
- Current location is automatically saved.
- ‘Enter Location manually’ option allows you to enter location lat\longcoordinates manually in decimal format (ex. Lat: 40.76 N, Lon: 73.984W) and add a name (ex. New York, NY). Other formats such as degreesminutes seconds, degrees decimal minutes are also supported. You canset the format in Weather settings.
- Select airport: Selecting the ‘By Airport Code’ allows users to searchfor an airport either using the 3-letter airport code or by city name
Enter a user-friendly name
- Configure the display frequency, duration (days), units and types of various weatherparameters to request forecast
Exit Settings and return to the home screen
You are now ready to use Iridium Mail & Web features.
Iridium Mail & Web App - iOS Quick Start Guide
Iridium Mail & Web mobile application is available for download on the Apple iOS App Store™. This quick start guide provides step-by-step instructions for configuring Iridium Mail & Web application & its various features to work with Iridium GO!.
Download Iridium Mail & Web app
While connected to a Wi-Fi network (recommended) or a terrestrial cellular network with data connection, search for ‘Iridium Mail & Web’ in Google Play store. Download and install the app on your iPhone® or iPad® running iOS 6.1 or higher.
Register for an Iridium account
Navigate to www.iridium.com/mailandweb URL to fill out the registration form, follow the instructions and register for a username and password. Select ‘Iridium GO!’ from the device selection drop-down menu in the registration form. Registration for an account is free and required to use the application.
Pair the iOS device with Iridium GO!
- Setup the Iridium GO! unit in an outdoor area with open access to the sky and adequate signal strength prior to use
- Flip up the antenna on Iridium GO! to turn it on
- Wait for Iridium GO! to initialize and establish connection with the Iridium network
- On your iOS device, go to Wi-Fi setting and select ‘Iridium-xxxx’ network. Wait for your iPhone or iPad to connect to the Iridium GO! Wi-Fi network.
Login to the application
Open the Iridium Mail & Web app. You will be asked to enter the registered username and password. Enter the credentials as supplied during registration and click on ‘Login’ to gain access to the application. Accept the terms and conditions outlined in the End User License Agreement popup. This dialog is displayed only on the initial user login.
Configure device connection type
After logging in to the application for the first time, the app will guide you to configure the device connection type. Click OK to be redirected to the device selection screen. Select ‘Iridium GO!’ as your connection type and click the back button. Alternatively, you can run the device auto-detection capability by selecting ‘Detect Device’ button.
Note: Ensure that the ‘Diagnostics’ is turned off. This is an advanced option and is used Iridiumsupport personnel to troubleshoot device connection & detection issues with the user.
To access web pages using Iridium Mail & Web:
- Click on the ‘Web’ icon on the home screen
- Click the upper-right "Connect" option to start your connection
- Go to Safari, enter a mobile website and press "Go"
- Continue to access Web content. When finished, close Safari and return to the Iridium Mail & Web app.
- Click the "Connection" icon on the main Web screen and stop the data connection
Note: Airtime charges will continue while the connection is active. Do not visit standard Internet pages as videos and graphic-heavy pages designed for broadband networks will not download properly using Iridium Mail & Web.
Configure Social Media settings (Twitter)
- Connect to the internet at home before going on your trip. Twitter registration will fail if you are not connected to the internet.
- Click on the Settings icon on home screen, select ‘Social Media’ and turn on Twitter
- A window will appear asking you to login to Twitter & authorize Iridium Mail & Web to post on your behalf. Enter the login information and click OK
- Allow Iridium Mail & Web access to your Twitter account
- A PIN will be generated once authentication has been granted. Record the PIN.
- Enter the PIN in the appropriate location and hit OK.
Once this configuration is complete, tweets can be posted via Iridium Mail & Web using the Twitter icon on the home screen.
Configure weather forecast service
The application provides various user-customizable settings for the weather forecast service. To configure these settings
- Click on Settings icon on the home screen
- Click on ‘Weather’
- Set locales: allows you to request weather information for different locations.
You can either save current location, enter latitude\longitude coordinates manually orselect from a list of approx. 9000 airports worldwide
- Click on ‘Locations’
- To add a location, click on ‘Add Another Location’ button.
- Current location is automatically saved.
- ‘Enter Location manually’ option allows you to enter location lat\long coordinates manually in decimal format (ex. Lat: 40.76 N, Lon: 73.984 W) and add a name (ex. New York, NY). Other formats such as degrees minutes seconds, degrees decimal minutes are also supported. You can set the format in Weather settings.
- Select airport: Selecting the ‘By Airport Code’ allows users to search for an airport either using the 3-letter airport code or by city name
- Enter a user-friendly name
- Configure the display frequency, duration (days), units and types of various weather parameters to request forecast
Exit Settings and return to the home screen
You are now ready to use Iridium Mail & Web features.
Sending Email using Iridium Mail & Web for Android on Iridium GO!
ollow the steps below on how to send emails using the Iridium Mail & Web application for Android.
Note: Before following the instructions below, please ensure you have completed the setup and configuration instructions outlined in the Iridium GO! Mail & Web Quick Start Guide for Android.
- Launch the Iridium Mail & Web application.
- Select Mail from the Iridium Mail & Web home screen.
- Select Email to access your Email Inbox.
- Press the Menu key on your Android handset and select Compose.
- Enter the email address of the recipient, the subject of the email, and the body of the message. When finished, collapse the keyboard by pressing the Back button on your Android handset.
- Press the Menu key on your Android handset and you will be presented with options. Select Send to queue up the email for delivery.
- Select Send/Receive Email
- When you're ready to transmit your email, ensure the Iridium GO! is registered to the network and it is maintaining at least 3 bars of signal strength. Select Send/Receive Email to establish the data connection and send the email message.
- The progress indicator and log will provide you with the necessary information to ensure the email has been sent successfully.
Sending Email using Iridium Mail & Web for iOS on Iridium GO!
Follow the steps below on how to send emails using the Iridium Mail & Web application for Android.
Note: Before following the instructions below, please ensure you have completed the setup and configuration instructions outlined in the Iridium GO! Mail & Web Quick Start Guide for iOS.
- Launch the Iridium Mail & Web application.
- Select Mail from the Iridium Mail & Web home screen.
- Select the New Message icon in the lower right corner to start a new email message.
- Enter the email address of the recipient, the subject of the email, and the body of the message.
- When finished composing the email message, add the email to the Outbox by selecting To Outbox.
- The Outbox will now display one new message queued up for delivery. Select the Send/Receive icon in the lower left corner.
- When you're ready to transmit your email, ensure the Iridium GO! is registered to the network and it is maintaining at least 3 bars of signal strength. Select Send/Receive Mail to establish the data connection and send the email message.
- The progress indicator and log will provide you with the necessary information to ensure the email has been sent successfully.
Troubleshooting Questions - Iridium GO!
Trying to troubleshoot your Iridium GO? Below are a few commonly asked questions that may help you troubleshoot your device.
Have you successfully connected to the Iridium Wi-Fi Network using your smartphone or tablet?
This is the first step after powering up your GO! You should see an option that begins with the word IRIDIUM in your WIFI settings on your smart device. Connect to that.
Have you downloaded the Iridium GO! app and logged in?
When connected to the Iridium GO! WIFI network only data flowing through the Iridium GO! App or other Iridium GO! approved apps will work. The Iridium GO! app can be downloaded from the App Store or Google Play. There is no charge for this app.
When trying to connect was the GO! unit (or connected antenna) outside with a clear view of the unobstructed sky?
Iridium GO! requires a line of sight access to the satellite. Please make sure you are outdoors with a clear view sky and there are no tall structures blocking the horizon.
Was the antenna fully extended and pointing up toward the sky?
The antenna should be properly extended an pointed up.
What messages (in sequential order) are displayed on the screen as the GO! powers up?
Iridium GO! will automatically complete the power up sequence in approximately one minute and will begin registration with the Iridium network. Once registered, the signal strength icon will appear on the Iridium GO! device screen.
Were there any error messages or codes shown on the phone's display (if so please list them)?
The reason for the error code may be listed in your user manual. These codes are also valuable to your service provider if you need to contact them for support.
How many signal bars are showing on the display?
If the bars show your signal is fluctuating or if the signal always seems low then you may need to try a different location to place your call. Sometimes it is as simple as walking away from a building. Depending on your situation you may need an external antenna with higher gain.
What is the GO!'s battery level?
In some cases we have seen a low battery seems to cause performance fluctuations. Make sure your battery is well charged.
What geographical area (s) have you attempted to use the GO!?
Check to make sure nothing is potentially blocking the satellite from view. If there is no blockage or if you are not getting reception in multiple geographic areas it could indicate there is a physical problem with your antenna.
How many times have you attempted to connect?
Satellite signals can fluctuate and depending on where you are and where the satellite is the call may or may not go through. The call quality can fluctuate as well. If you are sometimes able to make a successful call, then there is likely no issue with your equipment. It is probably due to reception and the satellite network. If you cannot make a call wait far a few minutes and try placing the call again.
Are either phone calls or data working?
If one of the two is working then you have a working device. Go back and carefully review the setup steps and instructions to make sure you are doing everything as specified. Also try connecting with a different smart device. If you are able to connect with a differnt device then you may want to double check the settings on the device that doesn't work. If you are unable to connect with either smart device then you may want to double check the settings on your GO!
Have you ever been able to make a successful phone call?
If you have never been able to make a successful call, check to make sure you are dialing correctly. Also check to see if you are able to receive a call. If you are able to make some calls, the issue is more likely the satellite network or coverage and not your device.
Have you ever been able to make a successful data connection?
If you have never been able to make a successful data call, check to make sure you are everything it set up correctly and your device showing it is connected to the GO!. Try sending something basic like an SMS or short email to verify if you can get data through at all.
What type of data (email, SMS, weather, web page, etc...) are you attempting?
Keep in mind that the Iridium connection is much slower that the typical data connection you are used to. Web pages may time out or load very slowly. Emails with large attachments may get stuck and keep other information from going through.
Removing the SIM PIN on an Iridium GO!
Removing the SIM PIN on your satellite device is a necessary procedure in some cases because they are equipped with security features that enable the locking of the device to protect against unwanted use. Often times though, many satellite device owners only use their devices for emergency purposes and setting a lock on their device can leave the device unusable in an emergency if the passcode is forgotten.
For the GO! device, the process is a little different than on a standard Iridium handheld device. Follow these instructions below, depending on your device, for unlocking and removing the SIM PIN on an Iridium GO!
For Android:
- Connect to the Iridium GO! Wi-Fi network with your device
- Open the Iridium GO! app
- The GO! will ask for you to login. Use the username: guest and the password: guest
- Tap the Submit button
- The GO! will ask for you PIN. Enter 1111 (This is the default PIN. If it has been changed, you may be prompted to enter the Pin Unlock Code (PUK). You will need to contact your service provider to obtain your PUK code) then tap OK.
- Press "Settings"
- Scroll down to and tap on "Security"
- Tap on "Disable SIM lock" then on "Existing SIM PIN"
- Enter 1111
- Hit "OK"
- Press the back button on your Android device
- A dialogue box with the statement "Do you want to save?" will appear, tap on the "Save" button.
For Apple iOS:
- Connect to the Iridium GO! Wi-Fi network with your device
- Open the Iridium GO! app
- The GO! will ask for you to login. Use the username: guest and the password: guest
- You will be challenged for a PIN. Enter 1111 (This is the default PIN. If it has been changed, you may be prompted to enter the Pin Unlock Code (PUK). You will need to contact your service provider to obtain your PUK code) then tap OK.
- Press the "Submit" button
- Tap on "Settings" then "Security" then "SIM Lock Status"
- Press "Disable SIM Lock"
- Tap on "Enter Number" to the right of "Existing SIM PIN"
- Enter 1111
- Tap anywhere on the screen (away from the on-screen keyboard).
- Press the "Save" button.
As mentioned above, if your PIN is entered too many times, your SIM will become Blocked. Contact your service provider to obtain your PUK (Pin Unlock Code) to unlock your SIM, then you can remove PIN protection. If your PUK is entered too many times, the SIM will become permanently unusable and you will have to contact your service provider to obtain a new SIM.
Iridium PTT (Push to Talk)
Iridium Extreme PTT - Push-To-Talk Mode Quick Guide
Entering PTT Mode
Follow these steps to enter PTT Mode if your Iridium Extreme PTT device is in Phone Mode:
- Press the left soft key, labeled Menu.
- Press the left soft key, labeled Select > Switch to PTT. The transition to PTT Mode takes approximately 10 seconds. “Waiting for Registration” is displayed on the device after the switch to PTT.
- To switch back to phone mode, go back to Menu and select Switch to Phone.
Navigating to Phone Mode to Dial
If you attempt to dial a phone number while in Push-To-Talk mode, you will receive the following notification: “Dialing not supported. Must go to Phone mode to dial”.
- Press the left soft key, labeled Phone to switch to Phone Mode. As you are transitioning, you will be prompted to “Dial number again when in Phone Mode”.
- If you want to remain in PTT Mode, press the right soft key, labeled Back to return to the previous screen.
Using SOS in PTT Mode
If you attempt to press the SOS button while in PTT Mode, you will receive the following notification: “WARNING! Must go to Phone Mode for SOS.”
- Press the left soft key, labeled Phone, to switch to Phone Mode. While transitioning, you will be prompted to “Press SOS again when in Phone Mode”.
- You must press the SOS button again in Phone Mode to successfully initiate an SOS call.
How to Use Push-To-Talk
Once in PTT Mode follow these instructions to communicate with the rest of your Talkgroup:
- Push and hold the PTT Button
-
Wait for the Talk Tone, three notes ascending in rapid succession, granting you the floor and allowing you to speak
-
Once granted the floor your handset will display TALKING and listeners will have LISTENING displayed on their device.
- When TALKING is displayed and the PTT Button is held down all other keys are disabled during use. The device cannot perform other functions until the PTT Button is released.
You may hold the PTT Button and communicate with the Talkgroup for a maximum of 20 seconds per PTT Button press. If you have configured your device with Talk Timer Enabled, the time remaining to speak in the current talk period is displayed on the screen below the Device Name.
Talkgroup Terms
While in PTT Mode your Device will show various Statuses on screen. See below for each Status and what they mean.
Open
When the talkgroup is active but no one is talking, the screen displays OPEN.
This indicates that the floor is available, and that participants may request the floor by pushing and holding the PTT Button.
Listening
Your device displays LISTENING when the Talkgroup is active, but you are not the one talking.
Talking
Your device displays TALKING when the Talkgroup is active, and you are holding down the PTT Button.
Dialing Out With Your Iridium PTT Satellite Phone
To place a call anywhere in the world:
- Dial 00 + Country Code + Phone Number. For example, to call a US number you would dial 00-1- 10-digit phone number
To call another Iridium satellite phone:
- Dial 00 + Iridium Phone Number (8816-xxxx-xxxx)
How To Communicate With an Iridium Satellite Phone
There are a few ways to communicate with an Iridium Satellite Phone user. Below are all the different ways to do so:
- Dial 011+ the satellite phone number (8816-xxxx-xxxx)This is an international call and will be billed to the caller at their long distance rate by their telephone service provider.
- SMS Message- receive free text email up to 120 characters per message the customer needs to visit http://messaging.iridium.com/
- Sending an EMail - Use the customers Iridium Phone Number as their email address. Example - IRIDIUMNUMBER@msg.iridium.com
- Using 2 Stage Dialing- Dial 1-480-768-2500. At the prompt enter the 12 digit Iridium phone numberThis feature will deduct the usage time from the satellite phone user
Accessing your Voicemail
In order to access your voicemail on an Iridium Satellite Phone, please follow the instructions listed below:
- From the Iridium phone dial 00881662990000 (From a land line dial 011 881662990000)
- When you are prompted to enter the iridium number you are trying to reach enter your IRIDIUM VOICE NUMBER
- Then you will hear the greeting. In the middle of the greeting press the star (*) button.
- At that point you will be asked to enter a password. Enter last 7 digits of the Iridium Voice Number that has been assigned to you.
- You will then be in the voice mail set up platform you will be prompted through from there
- Once you have set up your voice mail follow Repeat Steps 1-4.
Note:
- Voice mail and text messages are only saved in the Iridium network for 24 hours.
Entering PTT Mode
Follow these steps to enter PTT Mode if your Iridium Extreme PTT device is in Phone Mode:
- Press the left soft key, labeled Menu.
- Press the left soft key, labeled Select > Switch to PTT. The transition to PTT Mode takes approximately 10 seconds. “Waiting for Registration” is displayed on the device after the switch to PTT.
- To switch back to phone mode, go back to Menu and select Switch to Phone.
Using SOS in PTT Mode
If you attempt to press the SOS button while in PTT Mode, you will receive the following notification: “WARNING! Must go to Phone Mode for SOS.”
- Press the left soft key, labeled Phone, to switch to Phone Mode. While transitioning, you will be prompted to “Press SOS again when in Phone Mode”.
- You must press the SOS button again in Phone Mode to successfully initiate an SOS call.
How to Use Push-To-Talk
Once in PTT Mode follow these instructions to communicate with the rest of your Talkgroup:
- Push and hold the PTT Button
-
Wait for the Talk Tone, three notes ascending in rapid succession, granting you the floor and allowing you to speak
-
Once granted the floor your handset will display TALKING and listeners will have LISTENING displayed on their device.
- When TALKING is displayed and the PTT Button is held down all other keys are disabled during use. The device cannot perform other functions until the PTT Button is released.
You may hold the PTT Button and communicate with the Talkgroup for a maximum of 20 seconds per PTT Button press. If you have configured your device with Talk Timer Enabled, the time remaining to speak in the current talk period is displayed on the screen below the Device Name.
Talkgroup Terms
While in PTT Mode your Device will show various Statuses on screen. See below for each Status and what they mean.
Open
When the talkgroup is active but no one is talking, the screen displays OPEN.
This indicates that the floor is available, and that participants may request the floor by pushing and holding the PTT Button.
Listening
Your device displays LISTENING when the Talkgroup is active, but you are not the one talking.
Talking
Your device displays TALKING when the Talkgroup is active, and you are holding down the PTT Button.
Iridium Extreme PTT - How to Check Firmware Version
Before updating your Firmware it is important to know what firmware version your phone currently has installed. Please follow the instructions below to find your devices current firmware.
- While on the main screen, please select Menu.
- In the Menu, go down to Setup and press select on the bottom left.
- Here you will have to scroll down until you see Phone Information, click on this.
- In the Phone Information screen you will see the Firmware Version as the first option.
Please Note -The latest firmware upgrade for the Iridium Extreme PTT is version HP21001 release. (December 2021).
Iridium PTT Firmware Update: Staying Connected with HT21001
Introduction
This document details the use of the Iridium Extreme PTT firmware upgrade tool and lists the feature changes contained within the version HP21001 release.
Note - If you are unsure of your devices Firmware, please check using our How to Check Firmware Version article.
Upgrade Tool OS Compatibility
The upgrade tool that accompanies this release has been tested with Microsoft Windows 10. The instructions that follow in this document assume the use of this version of Microsoft Windows.
Performing the Upgrade
The following steps should be used to upgrade an Iridium Extreme® PTT from version HP15003 or later.
Download and Run the upgrade installer application.
- Download the Iridium Extreme PTT Firmware Upgrade Tool (Also found at the bottom of this Article)
- The application is named “Iridium Extreme Push-to-Talk Software Upgrade HP21001 Installer.exe"
- This will place the upgrade tool and USB drivers into the C:\ProgramFiles\Iridium\Extreme directory
Prior to performing the upgrade complete the following:
- Disable Bluetooth on the PC running the upgrade
- Remove the SIM card from the handset and install the handset battery
- Turn the handset on
- Ensure that the battery is fully charged or a charger is connected to the handset
Connect the handset to the PC using a USB cable
- If the handset is being connected to this PC for the first time, or to a USB port that has not been used before, the driver will be installed automatically. If this is the case, wait for Windows to show the "New Hardware Installed" notification before proceeding.
- If Windows is unable to automatically locate the USB driver, it can be found at C:\Program Files\Iridium\ExtremePTT\USB\VCOMPORT
Run the Iridium Extreme Software Upgrade tool
- A shortcut to this application should be available in the Start Menu in the Iridium Extreme Software Upgrade folder
- The target of the shortcut is C:\Program Files\Iridium\Extreme\Upgrade_Tool\ Iridium Extreme Push-to-Talk Software Upgrade HP21001.exe
Follow instructions presented by the upgrade tool user interface.
- During the upgrade process the handset will display various information on the screen, including “Upgrading…”
- At times the handset screen may go completely blank
- Do not disconnect the handset or press any keys while the upgrade is in progress
NOTE: The handset will be rebooted into a USB standard Device Firmware Upgrade (DFU) mode during the upgrade. The DFU driver will be installed if the PC has never been used with a handset in DFU mode before. If Windows is unable to automatically locate the USB DFU driver, it can be found at C:\Program Files\Iridium\Extreme\USB\DFU.
Hardware Compatibility
This software release has been tested to be compatible with the following hardware models;
Iridium may produce and distribute hardware models loaded with software version HP18005 that are not indicated on this list at its sole discretion and without notice.
Change List
The following table lists the changes made in HP21001 that may affect the product user. The table lists only the changes made since the previous release, HP19004
Iridium 9505a
Iridium 9505A Firmware Upgrade Instructions - IS09002
The Iridium 9505a reach End of Life status in May of 2009. It is technically no longer supported. Upgrading firmware may solve issues, but it is strongly recommended that users upgrade to a 9555 or 9575.
Important
In order to perform this firmware update you will need the following items:
- An Iridium 9505A - RS232 Data Adapter
- A cable to connect your Computer to the RS232 Data Adapter:- A Serial Cable (check compatibility with your Computer)or- An Iridium 9505A - USB to Serial Cable (if your Computer does not have a Serial Port)
- A Windows-based PC with a serial/COM port (or USB port if you have the Iridium 9505A - USB to Serial Cable)
- The Iridium Upgrade Tool (included at the end of these instructions)
Update Instructions
- Establish a serial connection between the 9505A and a PC(ensure battery fully charged).
- Launch the Iridium Phone Upgrade Tool and choose the appropriate COM port for your PC.
- Click “Check connection”. The following window should appear.
- Click “Upgrade”. Progress will be indicated as shown below. This should take from 3 to 8minutes.
- Click “Exit” or repeat steps 1-4 to re-flash additional units.
Iridium Certus
Thales VesseLink Firmware Upgrade Instructions - 2.0.0.2
Introduction
On occasion it may be necessary to update VesseLINK™ software to add features or fix issuesfound in the software. This section will step through the process of those updates. The firmwarefile will contain updates for both the TU and the antenna if needed, so a single load automaticallyupdates both. It is important to make sure the system is connected, powered up, and operationalbefore attempting a firmware update. Do not remove power from the TU or remove theantenna connection while an update is in process. This may cause a corruption to occur andforce reverting to the previous software version.
Important - This Software Update enables 700 kbps download speeds!
Installing the Firmware on VesseLink
Once you have the file downloaded, which can be downloaded here, follow the instructions below to apply the update to your Thales VesseLink.
Via Computer or Mobile device.
- With PC or Mobile Device connect to “ThalesLINK” on Wi-Fi or via Ethernet (RJ45) port.
- Open a web browser and type: http://portal.thaleslink (do not type .com or any otherextension)
- Once prompted enter Username and Password.
- Navigate to the SYSTEM > Firmware (See Below)
- Select CHOOSE FILE.
- Go to File Input and select the Browse button.
- Navigate to location of downloaded file. This file should have the firmware versionand “.swu” as the file extension
- Example: thaleslink_2.0.0.2.swu
- Select the “SELECT” button
- After file has been selected return to the Firmware page.
- Select “UPLOAD FIRMWARE” button. This may take a few seconds as a progressbar moves across the page (See Below).
- Once staged the Firmware page will display “UPDATE STAGED” (At this point userwill be able to see Current and New Versions side by side on the Firmware page)
- Select “Yes, Update”.
- . Once YES, UPDATE is selected, the process to Update Firmware has begun and willtake approximately 10 to 15 minutes to complete. *DO NOT REMOVE POWERDURING THIS PHASE*
- . Once completed and the system reboots, wait for all the Status LEDs to go SolidGreen and/or Blue. This may take a few more minutes.
- . Verify Firmware Update by connecting to “ThalesLINK” (or SSID set inVesseLINK™) on Wi-Fi or Ethernet port.
- Open a web browser and type: http://portal.thaleslink (do not type .com or any otherextension).
- Once prompted enter the admin Password (this will not change from before thefirmware update).
- Navigate to the SYSTEM > Firmware to view updates. (Software version can also befound in the ABOUT menu item.)
Thales MissionLink Firmware Upgrade Instructions - 2.0.0.2
Introduction
On occasion it may be necessary to update MissionLINK™ software to add features or fix issuesfound in the software. This section will step through the process of those updates. The firmwarefile will contain updates for both the TU and the antenna if needed, so a single load automaticallyupdates both. It is important to make sure the system is connected, powered up, and operationalbefore attempting a firmware update. Do not remove power from the TU or remove theantenna connection while an update is in process. This may cause a corruption to occur andforce reverting to the previous software version.
Important - This Software Update enables 700 kbps download speeds!
Installing the Firmware on MissionLink
Once you have the file downloaded, which can be downloaded here, follow the instructions below to apply the update to your Thales MissionLink.
Via Computer or Mobile device.
- With PC or Mobile Device connect to “ThalesLINK” on Wi-Fi or via Ethernet (RJ45) port.
- Open a web browser and type: http://portal.thaleslink (do not type .com or any otherextension)
- Once prompted enter Username and Password.
- Navigate to the SYSTEM > Firmware (See Below)
- Select CHOOSE FILE.
- Go to File Input and select the Browse button.
- Navigate to location of downloaded file. This file should have the firmware versionand “.swu” as the file extension
- Example: thaleslink_2.0.0.2.swu
- Select the “SELECT” button
- After file has been selected return to the Firmware page.
- Select “UPLOAD FIRMWARE” button. This may take a few seconds as a progressbar moves across the page (See Below).
- Once staged the Firmware page will display “UPDATE STAGED” (At this point userwill be able to see Current and New Versions side by side on the Firmware page)
- Select “Yes, Update”.
- . Once YES, UPDATE is selected, the process to Update Firmware has begun and willtake approximately 10 to 15 minutes to complete. *DO NOT REMOVE POWERDURING THIS PHASE*
- . Once completed and the system reboots, wait for all the Status LEDs to go SolidGreen and/or Blue. This may take a few more minutes.
- . Verify Firmware Update by connecting to “ThalesLINK” (or SSID set inMissionLINK™) on Wi-Fi or Ethernet port.
- Open a web browser and type: http://portal.thaleslink (do not type .com or any otherextension).
- Once prompted enter the admin Password (this will not change from before thefirmware update).
- Navigate to the SYSTEM > Firmware to view updates. (Software version can also befound in the ABOUT menu item.)
Inmarsat
IsatPhone 2
Dialing Out With Your IsatPhone 2 Satellite Phone
To place a call anywhere in the world:
- Press and hold the 0 key until (+) appears on the display + Country Code + Phone Number. For example, to call a US number you would dial (+)-1- 10-digit phone number
To call another IsatPhone Pro:
- Press and hold the 0 key until (+) appears on the display + Inmarsat Phone Number (870-xxxx-xxxxx)
How To Communicate With an IsatPhone 2 Satellite Phone
There are a few ways to communicate with an IsatPhone 2 Satellite Phone user. Below are all the different ways to do so:
- From a US land line dial 011 + Inmarsat Phone Number (870-xxxx-xxxxx ). From other countries follow the rules for dialing an international number. 870 is your country code.This is an international call and will be billed to the caller at their long distance rate by their telephone service provider.
- SMS Message(Phone) - Your phone can receive on screen messages up to 160 characters per message from other IsatPhone 2s and some cellular phones. From a cellular phone the sender must follow their provider’s instructions. From another IsatPhone send an SMS to the subscriber’s satellite phone number. Standard messaging rates will apply plus international long distance charges. International SMS is not available on some cellular phones.
- SMS Message(Web)* - To send a free SMS visit www.satphonestore.com and fill out the form.
- Sending an Email - Use the customers IsatPhone 2 Phone Number as their email address. 870xxxxxxxxx@message.inmarsat.com
*The email/phone contact counts as part of the 160 characters allowance.
GEOS Registration & Configuration for Non-US Number Plans
Follow the steps below on how to register for GEOS and configure your IsatPhone 2.
Step 1: Register with GEOS
- Navigate to https://my-geos.com/registration
- Select option "Register or Manage Your Inmarsat Device
- Read and accept the GEOS terms & conditions
- Select option "First Time Registration" and click Continue
- Complete the GEOS registration form, fill out all of the required fields and click Register when done
- Once you have submitted and successfully completed the registration form you will be presented with a registration confirmation message
- You will also receive a welcome email from GEOS Alliance, providing you with the emergency contact details to configure your IsatPhone 2.
Step 2: Configure IsatPhone 2
- Power on your IsatPhone 2 handset
- Press Menu
- Navigate to Location Services and press Select
- Scroll to Assistance Button and press Select
- Scroll to Configure and press Select
- Scroll to Call Config and press Select
- Scroll to Add New Recipient and press Select
- Enter Geos in the Nickname field, enter +19365823190 in the Telephone field and press Save
- Press the Back button twice to return to the Assistasnce Config screen
- Scroll to Message Config and press Select
- Scroll to Edit Recipient, press Select, followed by Options
- Scroll to Add New Recipent and press Select
- Scroll to Text Message and press Select
- Enter Geos in the Nickname field, enter +61428029345 in the Telephone field and press Save
- You will be presnted with a confirmation messages which displays, "To save GEOS as a message recipient, confirm that you have registered your phone with them online" and press Confirm to continue
- You have successfully configured your IsatPhone 2 for use with GEOS, press the red button to return to the home screen.
IsatPhone 2 - How to Check Firmware Version
Before updating your Firmware it is important to know what firmware version your phone currently has installed. Please follow the instructions below to find the model of your device, as well as the current firmware.
- While on the main screen, please select Menu.
- In the Menu, go down to the Wrench Icon on the bottom left to select Settings
- Here you will have to scroll down until you see an Asterisk Icon for the About section, click on this.
- In the About screen you will see the Model and Firmware Version of your device.
Please Note:The current firmware for the original IsatPhone 2 is 2.00.03.The current firmware for the IsatPhone 2 Model 2.1 is 1.00.13.
IsatPhone 2 Firmware Upgrade Instructions
Introduction
IsatPhone 2 firmware upgrades have now been released and is available for download. Please follow download instructions below.
This is a mandatory firmware upgrade, meaning that the features introduced by the firmware are critical for the functionality of the GSPS service including the network and the IsatPhone 2 handset.
IsatPhone 2 Models
IsatPhone 2 is available in two models. The original IsatPhone 2 model has been available since 2014. The second model IsatPhone 2 (Model 2.1) was introduced in 2018. Both models use different firmware versions, USB drivers and software tools. Please make sure to identify your correct IsatPhone 2 model before proceeding to download and install new files.
The firmware upgrade for the original IsatPhone 2 is 2.00.03. The firmware upgrade for the IsatPhone 2 Model 2.1 is 1.00.13.
How do I identify the new IsatPhone 2 (Model 2.1)
The new ‘Model: 2.1’ details are displayed on the outside of the phone’s packaging and on the CE label inside the handset. You can also identify the model by going to the ‘About’ menu setting of the handset, detailed in the instructions below:
- While on the main screen, please select Menu.
- In the Menu, go down to the Wrench Icon on the bottom left to select Settings
- Here you will have to scroll down until you see an Asterisk Icon for the About section, click on this.
- In the About screen you will see the Model and Firmware Version of your device.
Installing the IsatPhone 2 Firmware Upgrade
Step 1: Downloading the Correct Drivers, Firmware, and Upgrade Tools
1. Use information above to determine the correct model of your IsatPhone 2. If you are unsure please contact your provider to determine correct model.
2. Download the correct Upgrade Tool for your IsatPhone 2 Model
- IsatPhone 2 (Pre 2018) - Download IsatPhone 2 Firmware Upgrade Tool
- IsatPhone 2 Model 2.1 - Download IsatPhone 2 Firmware Upgrade Tool
3. Download the correct USB Drivers for your IsatPhone 2 Model
- IsatPhone 2 (Pre 2018) - Download IsatPhone 2 USB drivers
- IsatPhone 2 Model 2.1 - Download IsatPhone 2 USB drivers (Model 2.1)
NOTE: USB Drivers are compatible with Windows 10, Windows 8, Windows 7 and Windows XP.
4. Download the correct Firmware Update for your IsatPhone 2 Model
- IsatPhone 2 (Pre 2018) - Download IsatPhone 2.00.03 Firmware
- IsatPhone 2 Model 2.1 - Download IsatPhone 2 (Model 2.1) Firmware 1.00.013
Step 2: Setting Up the IsatPhone 2 Firmware Upgrade Tool
1. Open the IsatPhone 2 Firmware Upgrade Tool provided above
2. Click Next
3. Read and select I accept the terms of the Licence Agreement and click Next.
4. Click Install to begin the installation process.
Note: You can click Browse to change the installation folder location.
5. Click Next after the installation process is complete.
Note: You can click Show details to display the installation details.
6. Click Finish. The setup is complete.
Note: If Run the application is selected, the tool is launched once the setup is complete.
Step 3: Upgrading the IsatPhone 2 Firmware
1. Before starting the Firmware Upgrade Tool, ensure that your phone is not connected to yourcomputer.
2. Select Start > Programs > IsatPhone 2 > Firmware Upgrade Tool > Firmware Upgrade Tool. Browse and select the .fpk file (upgrade image file) and click Next.
NOTE: If the file is not valid, for example an incorrect file has been selected or your phone is connected to your computer, an error message will appear.
3. Connect your IsatPhone 2 to your computer with the supplied USB cable. If your phone is not switched on, switch it on now.
Note: When your phone is connected to your computer, the Start upgrade button is enabled, the phone is connected and Ready to upgrade is displayed in the status field.
7. Click Start upgrade to begin the firmware upgrade.
NOTE: If your phone is disconnected or an error has occurred during the upgrade, an error message is displayed. Correct and repeat the upgrade until successful.
8. When the upgrade is complete, a Device upgraded successfully message is displayed in the status field indicating that your phone has been successfully upgraded. Click Finish to close the application.
9. After upgrade the phone will remain in an upgrade complete state. By removing the USB cable your phone will automatically restart.
10. Your phone is now ready to use
After installation, you can check the firmware version by switching on the phone and selecting Menu > Settings > About > Firmware version
Fixes and enhancements in this release
- Added options for battery charging to extend the battery life
- Added Turkish language support
- Support for new MEAS region
- Improved handling of the leap second event
- Improved reported GPS location accuracy
- Corrected email reply format
- Other improvements and minor bug fixes
IsatPhone
Dialing Out With Your IsatPhone Pro Satellite Phone
To place a call anywhere in the world:
- Dial 00 + Country Code + Phone Number. For example, to call a US number you would dial 00-1- 10-digit phone number
To call another IsatPhone Pro:
- Dial 00 + Inmarsat Phone Number (870-xxxx-xxxxx)
If you have a US Number Plan click here for Dialing Instructions.
How To Communicate With an IsatPhone Pro Satellite Phone
There are a few ways to communicate with an IsatPhone Pro Satellite Phone user. Below are all the different ways to do so:
- From a US land line dial 011 + Inmarsat Phone Number (870-xxxx-xxxxx ). From other countries follow the rules for dialing an international number. 870 is your country code.This is an international call and will be billed to the caller at their long distance rate by their telephone service provider.
- SMS Message(Phone) - Your phone can receive on screen messages up to160 characters per message from other IsatPhone Pros and some cellular phones. From a cellular phone the sender must follow their provider’s instructions. From another IsatPhone send an SMS to the subscriber’s satellite phone number. Standard messaging rates will apply plus international long distance charges. International SMS is not available on some cellular phones.
- SMS Message(Web)* - To send a free SMS visit www.satphonestore.com and fill out the form.
- Sending an Email - Use the customers IsatPhone Pro Phone Number as their email address. 870xxxxxxxxx@message.inmarsat.com
*The email/phone contact counts as part of the 160 characters allowance.
How to Check Prepaid Balance on IsatPhone Pro
Check Prepaid Balance With Your IsatPhone Pro
To check your prepaid minute balance on an IsatPhone 2 dial *106# and then press the green key. This is a free call.
Add More Prepaid Airtime
If you need to add more airtime go to http://www.satphonestore.com/top-up-your-isatphone.html (SatPhoneStore subscribers only)
Voicemail
There are two ways to check voice mail messages from the IsatPhone Pro.
- Press and hold the “1” key for a few seconds. Your phone will automatically connect to your Inmarsat voicemail account.
- Dial 570 and press the green key.
IsatPhone Pro Firmware Upgrade Instructions
Introduction
IsatPhone Pro firmware version 5.17.2 is released and available for download now. Firmware version 5.17.2 supersedes the firmware version 5.11.0 that was released in October 2015.
Recommendations for installation
For users of 5.3.0 or higher this is a recommended upgrade, meaning that the features introduced by the firmware are important but not critical for the GSPS service, including the network and the IsatPhone Pro handset.
For users who have not yet upgraded to version 5.3.0 or higher, this upgrade to 5.17.2 is considered ‘mandatory’ to avoid the phone becoming non-operational.
Installing the IsatPhone Pro Firmware Upgrade
Step 1: Downloading the Correct Drivers, Firmware, and Upgrade Tools
1. Download IsatPhone Pro Firmware Upgrade Tool
2. Download IsatPhone USB drivers
NOTE: USB Drivers are compatible with Windows XP, Windows Vista, Windows 7, 8 and 10. (For Windows 7, USB 3.0 is not supported.)
3. Download IsatPhone Pro firmware V5.17.2
Step 2: Setting Up the IsatPhone Pro Firmware Upgrade Tool
1. Open the IsatPhone Pro Firmware Upgrade Tool provided above
2. Click Next
3. Read and select I accept the terms of the Licence Agreement and click Next.
4. Click Install to begin the installation process.
Note: You can click Browse to change the installation folder location.
5. Click Next after the installation process is complete.
Note: You can click Show details to display the installation details.
6. Click Finish. The setup is complete.
Note: If Run the application is selected, the tool is launched once the setup is complete.
Step 3: Upgrading the IsatPhone Pro Firmware
1. Before starting the Firmware Upgrade Tool, ensure that your phone is not connected to yourcomputer.
2. Select Start > Programs > IsatPhone Pro > Firmware Upgrade Tool > Firmware Upgrade Tool. Browse and select the .fpk file (upgrade image file) and click Next.
NOTE: If the file is not valid, for example an incorrect file has been selected or your phone is connected to your computer, an error message will appear.
3. Connect your IsatPhone Pro to your computer with the supplied USB cable. If your phone is not switched on, switch it on now.
Note: When your phone is connected to your computer, the Start upgrade button is enabled, the phone is connected and Ready to upgrade is displayed in the status field.
7. Click Start upgrade to begin the firmware upgrade.
NOTE: If your phone is disconnected or an error has occurred during the upgrade, an error message is displayed. Correct and repeat the upgrade until successful.
8. When the upgrade is complete, a Device upgraded successfully message is displayed in the status field indicating that your phone has been successfully upgraded. Click Finish to close the application.
9. After upgrade the phone will remain in an upgrade complete state. By removing the USB cable your phone will automatically restart.
10. Your phone is now ready to use
After installation, you can check the firmware version by switching on the phone and selecting Menu > Settings > About > Firmware version
Fixes and enhancements in this release
- Support for new MEAS region
- Improved reported GPS location accuracy
- Corrected the message content for the V-card delivery
- Improved the practice of the Fixed Number Dial (FND)
- Removed occasional crash events in some
BGAN
Cobham EXP710 - Helpful Hints
Here are a few Helpful Hints that may help you out with your Cobham EXP710 BGAN unit.
Getting Started
Here are a few Getting Started Tips to help you out with your Cobham EXP710 BGAN unit.
Opening Transport Latch
The EXPLORER 710 has a transport latch, securing the transceiver and antenna during transport. Before using the unit, this must be undone.
- Lift the transport latch to open the terminal.*
- Flip up the antenna module. You can now access the keypad and connectors on the EXPLORER 710.
* Due to tight tolerances in manufacturing the latch may be extremely tight when first purchased and may require the use of a tool to help.
Inserting the SIM Card
The SIM card is provided by your Airtime Provider. Follow the directions below to insert the SIM Card:
- Locate the SIM slot on the same side where the battery is inserted.
- Insert the SIM card into the SIM slot with the chip side facing up.
- Press gently until it clicks.
- Slide the lock in front of the SIM slot.
Inserting the Battery
To insert the Battery please see the instructions and images below:
- Insert the battery so that the connector fits into the battery slot, indicated in the figure.
- Press gently until it locks.
Powering EXP710 On and Off
- Slide and hold the power button until the Status indicator lights up and start flashing Green. This may take some seconds.
- When the Status indicator flashes slowly or is constant green, and the display shows Ready, the terminal is ready for use.
- To switch off, hold the power button until the Status indicator flashes yellow. This may take some seconds.
Pointing the Antenna
Before Pointing
Before pointing the antenna you can use the coverage map below to find your approximate location in relation to the satellites. Then you can use the compass to find the pointing direction to the closest satellite.
The 3 Inmarsat satellites are positioned above the equator, at the center of each “footprint"
To obtain optimum bandwidth and operating time, adjust the position of the antenna with great precision.
Do as follows:
- If the terminal is not already in pointing mode, select (gear icon) in the display and select Point now.
- Use the compass to locate the approximate direction from the antenna front face to the satellite.
- Slowly rotate and tilt the EXPLORER 710 antenna to find the highest possible signal strength. Use the display and the pointing sound to guide you. Remember that the more accurately the terminal is aligned, the better throughput and lower power consumption you will get!
- Press OK on the display keypad when you have obtained the highest possible signal strength.
Audio assisted pointing
You can set up whether or not you want a sound to indicate the signal level during pointing (Audio assisted pointing), to help you find the maximum obtainable signal strength. The sound pattern is as follows:
- Poor signal strength: • • • •
- Good signal strength: •••••••••••••••••••
- Optimum signal strength: (continuous sound instead of single “beeps”)
To enable or disable the pointing sound:
- Select (gear icon) in the display.
- Select Settings > Audio indication > pointing.
- Select On or Off.
The registration procedure (BGAN)
The display shows the progress as follows:
- Searching:The EXPLORER 710 searches for the network operator. Note that the search procedure can be very short, so you may not see this text.
- Registering:The EXPLORER 710 is registering itself on the network. If the GNSS position has not yet been acquired at this point, the display may show No position.
- Ready (or other status information):Ready means the EXPLORER 710 is registered on the network and is ready to go online. If there is any other status information to show, e.g. if a call or data session is active or there is a warning, the display will show that instead?
Note: By default, if you want to use a data connection, you must manually start it from the display or from the web interface.
To Re-Point the antenna
You may need to point the antenna again later, e.g. if the terminal has been moved or the signal is blocked. To start the pointing process again, do as follows:
- Display:Select (Gear icon) and select Point now. Then go through the pointing process as described in the previous section, and press OK in the keypad when the signal strength is OK.
- Web Interface:Select(Gear icon) (Control panel) > Point now. Then go through the pointing process as described in the previous section and click Accept in the web interface or OK in the display.
Pointing in EXPLORER Connect app
To start the pointing procedure from the EXPLORER Connect app, do as follows:
- Select Pointing from the EXPLORER Connect app.
- If the pointing process is not already started, tap Start. The signal strength is shown on the screen.
- Turn and tilt the antenna slowly as described in the previous sections until you have obtained the highest possible signal strength.
- Tap Accept. The terminal will now try to register on the BGAN network
LED Status
Connect WLAN Interface
To connect to the WLAN interface, do as follows:
- Check that WLAN is enabled in your EXPLORER 710. The top line of the display shows which interfaces are enabled.
- If your device is not close to the EXPLORER 710, turn the WLAN antenna of the transceiver into an upright position.
- Place your WLAN-enabled device (computer, tablet or smartphone) close to the EXPLORER 710, but not in front of the antenna.
- On your device, search for available WLAN networks.
- Select the EXPLORER 710 WLAN access point when it appears in your list of available wireless networks. The default name is EXPLORER710.
- You may have to enter a password.
By default, the password is the serial number of your EXPLORER 710 and the encoding type is WPA2. You can find the serial number in the display menu under Properties > Hardware > Unit serial number.Please make sure that the WLAN is Exposed, as shown in the image below:
Connect to the LAN interface
To connect to the LAN interface, do as follows:
- Connect the LAN cable to the network interface of your computer. A suitable cable is provided with your EXPLORER 710.
- Connect the other end of the cable to one of the LAN connectors on the EXPLORER 710.*
* Important: The ISDN interface and the LAN interface use the same connector type. Be careful not to connect to the wrong interface.
Your computer should now be connected to the EXPLORER 710. If you want to connect to the Internet, you must start a data connection.
Connecting Your Smartphone to the EXP710
To use your phone to make calls through the EXP710 using WLAN, do as follows:
- Start up the EXP710 terminal.
- Connect your smartphone to the wireless access point of the EXPLORER 710.*
- Start the EXPLORER Connect app and select Satellite Phone (or start another SIP application). If it is the first time you use the EXPLORER Connect app, you must select Register when prompted. **
* If you are having problems staying connected or registering via the EXPLORER Connect App place your device in Airplane Mode. Once you have done this, reactivate Wi-Fi and reconnect to the EXP710 to continue.
** If you are not prompted to Register please click the icon with two gears on the bottom right of the EXPLORER Connect App Home screen and Tap Register (as seen on the image below.)
NOTE:
If you are using the EXPLORER Connect app for the first time, make sure that “Enable Reception of Incoming Calls” is selected in the settings page. This is to prevent your smartphone from closing the WLAN connection when not in use. This is necessary in order to be able to receive calls on your smartphone.
Fleet One
Calling on the Fleet One
Once the Fleet One is registered with the BGAN network you are ready to make or receive thefirst call. The following sections provide a short guide to making calls.
Making a call on the SAILOR Fleet One
- Make sure your Fleet One is connected to the BGAN network
- From a phone connected to the terminal dial:00
Example: To call Cobham SATCOM in Denmark (+45 39558800) from an analogue phone, dial00 45 39558800
Note: If you are calling from an analogue phone, dial # after the number to activate the call.
Making a call to a Fleet One
To make a call to a phone connected to the terminal, dial:
+
- + is the international call prefix used in front of the country code for international calls.
- SAILOR Fleet One number: The number of the SAILOR Fleet One terminal you arecalling. The first part of the number is always 870, which is the “country code” for theBGAN system.
Example: If you are calling from Denmark and your SAILOR Fleet One number is870772420567, dial 00 870 772420567.
SMS Messaging - Fleet One
o see new SMS messages
When a new message has arrived, the icon bar at the top of the web interface shows anunopened envelope. Click the envelope to see the new message(s) or click MESSAGES fromthe left navigation pane. Click a message to read it.
Note: When you have received 100 messages, you must delete some of them in order tofree space for new messages. Otherwise, the new messages are rejected.
From the MESSAGES page you can Archive, Reply or Forward messages. Archive movesthe message to the Inbox.
To archive all new messages, click Move all new messages to Inbox.
Note: The Inbox does not contain new messages, but only messages that you have archivedfrom the MESSAGES page.
Sending an SMS message
- Click MESSAGES from the left navigation pane. This page contains new incoming messages.
- In the left navigation pane, click Write message.
- Type in the message in the Write new message field.If the message text is too long for one SMS, the message is sent as two or more SMS messages. The field below the message field shows the number of SMS messages used to send the message.
- Type in the phone number in the Recipient field.Remember 00 and country code (e.g. 00 45 for Denmark or 00 1 for USA).
- Select whether or not you want Delivery notification for this SMS message.If you click Yes, the Status column in the Sent folder will show the status of your message when it has been sent.You can set up delivery notification generally for all SMS messages. This setting is used bydefault when you send a message.
- Click Send.
The message is now sent and moved to the Sent folder.
Inbox, Outbox and Sent messages
- The Inbox contains incoming messages that have been read and moved from the MESSAGES page (see the previous page).
- The Outbox contains messages that have not been sent, e.g. because the terminal was not online when you attempted to send the messages.
- The Sent page contains messages that have been sent.
Setting up Default Message Options
You can set up general options for your outgoing messages. These settings apply by default to all your outgoing messages. Note, however, that you can change the Delivery notification setting for an individual message.
- Select MESSAGES > Message settings from the left navigation pane.
- If you want to include the original message when you reply, select Yes next to Include message in reply.
- Select whether or not you want Delivery notification for SMS messages.If you click Yes, the Status column in the Sent folder will show the status of your message when it has been sent.
- Click Apply.
SMS Service Center
The SMS service center number identifies the SMS service center used when sending and receiving SMS messages. The SMS service center number is stored on the SIM card.
Click Edit next to the number to change it. The SMS service center number is supplied by yourairtime provider.
Setting Up a Data Connection - Fleet One
To set up your data connection, do as follows:
- From the SETTINGS page, select Data connection.
- At Data connection select Enabled or Disabled.
- If you select Enabled, you can start a user data connection, either automatically or manually (see next step).
- If you select Disabled, you are not allowed to start user data connections on the BGAN network. However, you may still use the tracking function or an external data connection if enabled.
- At Automatic activation, select Enabled or Disabled.
- If you select Enabled, the terminal automatically starts a data connection.
- If you select Disabled, you must start a data connection manually from the Dashboard.
- Select the source of the APN (Access Point Name).There are two options for setting the APN. Unless you have special requirements, it is recommended to use the SIM default. You have the following options:
- SIM default. The APN is taken from the SIM card.
- User defined. Type in the APN. APNs are provided from the airtime provider.
- If your APN uses a password, type in the user name and password provided by your airtime provider.Note: If you are going to use a static IP address from your SIM card, the user name and password are mandatory!
- Click Apply.
Connecting to the Internet - Fleet One
By default, the terminal does not automatically connect to the Internet when you connect your computer or other equipment to the LAN interface. You must activate your connection from the Dashboard in the web interface or from an IP Handset from Cobham SATCOM (if available).
To access the Internet from a connected computer or wireless device, do as follows:
- On the connected device, open your Internet browser.
- Enter the IP address of your SAILOR Fleet One terminal. The default IP address is192.168.0.1.
- The built-in web interface of your SAILOR Fleet One terminal opens.With the web interface you can set up and control the SAILOR Fleet One and see statusinformation.
- At the top of the page, click the button Start data Connection.
You should now have access to the Internet.
Fleet Broadband
Fleet Broadband Crew Calling Instructions
Introduction
The aim of this guide is to provide you with a comprehensive outline of the function and usage of Crew Calling for your Fleet Broadband system. This document is divided into two sections; the first section provides the steps needed to allow an end-user to make a call using the crew calling system. The second section will describe how to configure a crew calling system on the Fleet Broadband network. This will allow a person in the field to configure and troubleshoot many common faults.
User Guide
In order to make a call from a remote site to the public switched telephone network (PSTN), a number of steps have to take place. Figure 1. provides an overview of the interconnected devices that have to communicate with each other to connect your call.
Making a call
The following procedure is to be followed when using the Crew Voice service on the Fleet Broadband terminal:
- Lift the Fleet Broadband Handset and dial 626#
- When prompted, enter your 12 digit PIN number.
- If successful, you will receive a message that states your remaining credit minutes. If unsuccessful, you will be prompted to re-enter your PIN number.
- You may now proceed to dial the phone number in the following format:
North America:
1 + area code + telephone number
International:
011 + country code + area code + telephone number
Note: Unrestricted handsets use the standard Inmarsat dialing rules. 001 + area code + telephone number
Configuration
This section will describe how to configure the Fleet Broadband to allow crew calling.
Fleet Broadband Configuration
1. Log into the Fleet Broadband administration page (192.168.0.1 default IP).2. Go to Administration then Restricted Dialing and click the Enabled restricted dialingoption.
3. Under allowed numbers of masks, enter “626”.4. Under phonebook dialing, enable outgoing calls to numbers in terminal phonebook.
5. Under Phone Status select which phone locals will have restrictions applied. In this example, we have configured the first local 5201 unrestricted and usable by the Captain. All remaining locals are restricted.
The next steps will guide you through the handset configuration.
1. In the terminal configuration go to Settings -> IP Handsets. Select the handset to be configured.
2. In the above example, 0503 will be configured for crew calling. Click configure.
3. In the new window, go to Contacts and enter the following:
4. Proceed to test the settings by dialing out on the Crew assigned handheld. You will not beable to access any number except for 626#. This will prevent abuse of the phone system.
Satellite Phone Airtime
Frequently Asked Questions
How to Add Prepaid Minutes to Your Device
To add prepaid minutes to your satellite device please click here and choose your device type.
You will need to know your satellite phone number or your SIM card number.
Please make sure that you are a SatPhoneStore subscriber. We cannot top up SIMs from other providers.
We currently offer prepaid vouchers for the following devices:
- Iridium GO!
- Iridium 9575
- Iridium 9555
- Iridium 9505a
- Iridium 9505
- Iridium 9500
- Iridium Fixed Phones
- Inmarsat IsatPhone Pro
- Inmarsat IsatPhone 2
- Inmarsat BGAN Devices
- AddValue iSavi
- Inmarsat Fleet One
- Inmarsat Fleet Broadband
- Thuraya Devices
How to Subscribe to a Monthly Plan
To sign up for a monthly airtime plan with SatPhoneStore click here.
How do I activate my sim card?
To activate your prepaid sim card, please click here